Make Peppermint Red Clay Cold-Process Soap (Mighty Mint)

Follow along as we make this natural cold-process soap, scented with peppermint essential oil and coloured with Mediterranean red clay. It is vegan, biodegradable and free of toxins such as (SLS, parabens and fragrance oils)
If you are new to soapmaking, please read our beginner’s guide to get started and reference the soap terms and definition list if you do not understand certain words.
Video tutorial
Our Recipe
The oil & butter blend for this recipe produces a mild and gentle bar of soap.
| Ingredients | Quantity (g) | Notes |
|---|---|---|
| Total oil & butter | 1500 | - |
| Extra virgin olive oil | 1050 | 70% of total oil & butter weight |
| Coconut oil | 375 | 25% of total oil & butter weight |
| Shea butter | 75 | 5% of total oil & butter weight |
| Sodium hydroxide (NaOH) | 202 | 98% purity - 8% lye discount/superfat |
| Water | 344 | 1.7:1 Water : NaOH |
| Mediterranean Red Clay | 15 | 1% of total oil & butter weight |
| Pure Peppermint Essential Oil | 15 | 1% of oil & butter weight |
Tweaking the recipe
If you want to make a smaller/bigger batch, you can use the soap recipe calculator spreadsheet we made below. Feel free to double check the recipes with Soapmaking Friend.
Download the soap recipe calculator
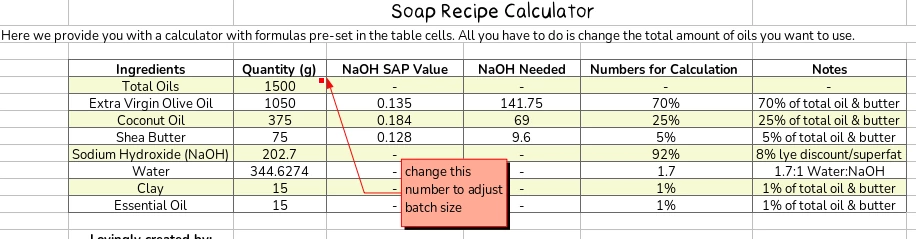
(it is in the OpenDocument Spreadsheet format – a free and open source format that can be opened with Microsoft Excel and Google Sheets or consider using free software like LibreOffice on PC or Collabora Office on mobile)
Step by Step Instructions
Notes
- read beginner’s guide to soapmaking if you need
- build your own recipes – use ours only as reference
- lye is corrosive! Read about lye safety.
Peppermint Red Clay Soap
Ingredients
- 1050g extra virgin olive oil
- 375g coconut oil
- 75g shea butter
- 202g sodium hydroxide - NaOH (98% purity, 8% lye discount/superfat)
- 344g water (1.7:1 water:NaOH ratio)
- 15g clay (1% of total oil & butter)
- 15g essential oils (1% of total oil & butter)
Tools
- Safety gear (rubber gloves, safety goggles, mask)
- Scale
- Lye safe containers x 3 (stainless steel, polypropylene, HDPE)
- Lye safe stirring utensil (stainless steel, silicone)
- Stick blender (optional if you have lots of time and patience!)
- Soap mould
Steps
- Have the recipe on hand, make adjustments to the batch size as necessary. Double check the math using Soapmkaing Friend.
- Prepare your workstation with all your tools, ingredients and safety gear

- Weigh out and melt coconut oil and shea butter using double-boiling method.
- Weigh out olive oil,combine it with other melted fats.
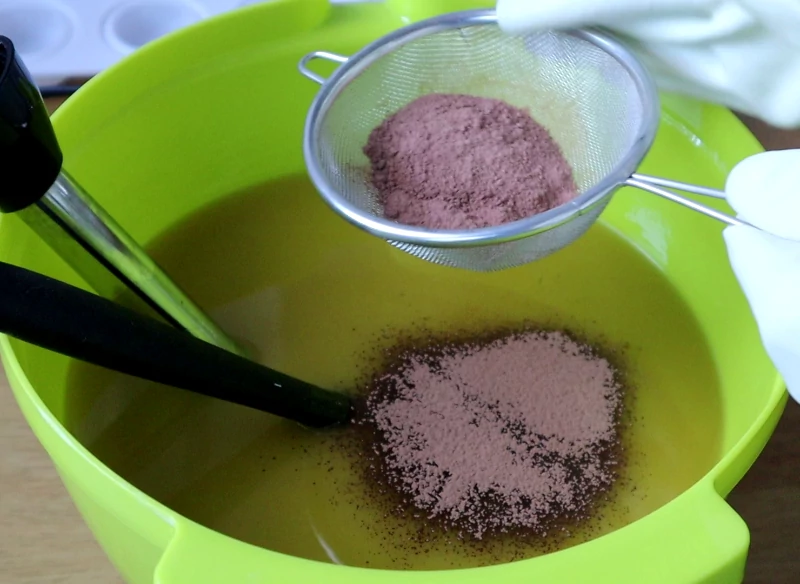
- Weigh out water & clay.
- Put on safety gear and weigh out sodium hydroxide. Carefully pour NaOH into water (never pour water onto lye as it will boil on contact and cause havoc!) and cover to protect from fumes. Stir occassionally to ensure all lye dissolves.
- Slowly pour lye solution into fat mixture and stir to combine. Using stick blender (remember to 'burp' it to remove air bubbles trapped in the shaft of blender) to pulse the mixture. Or use whisk to stir. Blend until it reaches light trace.
- Mix in red clay & peppermint essential oil. You might find it helpful to portion out a small amount of batter and whisk in the clay to prevent clumps. Be sure to weigh out exact amount of essential oil using a scale. Mix well.
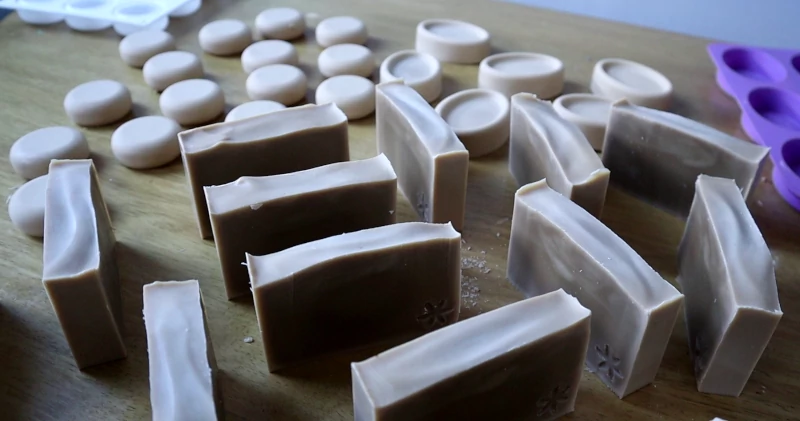
- Pour batter into mould and insulate with towels if you desire a gelled soap.

- You will be able to unmould within 24 hours. Let soaps cure for 4+ weeks in a ventilated area out of direct sunlight.
Why cure the soaps?
The curing phase is long but it is well worth it as water evaporates from the soaps during the process which helps them harden up to become more long-lasting rather than dissolving quickly during use. Also, curing lets the fats and lye become more acquainted with one another to become one. This makes the soap milder and its ability to create bubbles increases immensely over time.
A special example of curing is castile soaps made of 100% olive oil which may take more than 6 months of curing to become a batter bar of soap.